In 2007, we started BLOG Zentangle and began our enjoyable series of conversations within our Zentangle community.
In reading through these blog posts with their insightful comments, we decided to bring a few of them to your attention from time to time. It is easy, for me anyway, to sometimes think of old information as stale information. But these insights and conversations are anything BUT stale!
We invite you to enjoy this post from 2017...
Before I started my stationery company, Pendragon, Ink (many years ago!), I used to do a lot of painting. Painting was always fun. It kept me excited about life and and always thinking of the next canvas to cover or series to start. In a painting mindset, I noticed everything and was constantly taking notes or making sketches for the next day's endeavor.
One of my favorite parts was at the end when I often added a coat (or two or three) of gloss varnish to the surface of my (dry!) finished piece.
Just so you know, this is an occasional personal preference, not an absolute. I am not suggesting one has to varnish all their art! But this is an element on my palette of choices that I like the look of. I like how it can add depth and richness and increase color saturation. With a few coats it resembles those beautiful old paintings in museums that I love. Imagine, for example, an old table that you have just sanded, the wood all bare, and then you add a coat of varnish/shellac/urethane . . . what a difference!
Anyone who knows me, knows how quickly I do just about everything . . . I eat fast, cook fast, sew fast . . . well you get the picture. I paint with acrylics instead of oils for the same reason . . . Speed! But to me, acrylics seemed a bit flat or dull, so the varnish provided a look that the acrylic paint alone could not.
I was thinking about this the other day while I was tangling. "Hmm, I wonder what would happen if I varnished a tile?" But just to varnish a tiny tile every time the need arose would be a lot of work and clean-up . . . not what I wanted.
So I tried something different. I grabbed a bottle of clear nail polish and went to town! It was a dream come true! Here was this miniature handy-dandy brush, right in the the bottle, just the right size and I did not have to clean it afterwards! I had so many half filled bottles of all kinds of clear coats. The one I used here has a very subtle pink tint to it, just a whisper. But it brought out a whole new feeling of life wherever I applied it.
These tiles have about 3 coats on them. The first coat seals the paper, the second adds a bit of luster (you can stop at this point) but I added another for depth. Wait for each coat to dry before putting on the next. Of course follow the directions on the bottle. I use this in a room where the smell won't bother anyone. (Molly tells me that I can also try ModPodge, a water based varnish, for a similar effect. Ah . . . another project to look forward to!)
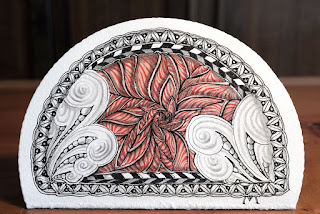
You can see on this diptych (a 2-paneled artwork) . . .
. . . that I varnished the right side panel, and not the left so you can see the difference.
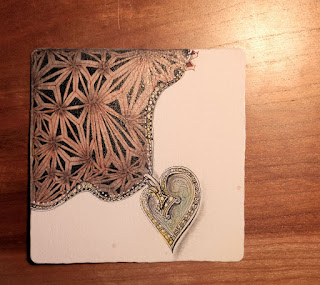
On this next heart piece on which I varnished the upper left corner . . .
. . . to create a dramatic difference dark to light.
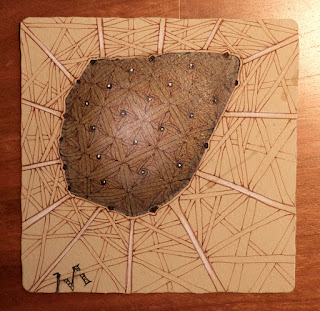
Next, I was experimenting on a tan tile, (one I had in my collection, that I did not mind if I screwed it up) and just varnished the "orbital cone-shaped whatch-a-ma-callit" in the middle.
It was pretty dark to begin with and got darker. When the coats were dry, I went back in and added white dots on the surface, and they just popped right off the paper!
If you decide to try this, start with a tile you don't mind experimenting with. You don't have to cover the whole tile. In fact, on each of these I only varnished small portions. I liked how it was more interesting than covering the whole tile.
That marvelous feeling I got from varnishing my old paintings returned. . . like a dear old friend. . . .
I'm not going to do this to all my tiles for sure, but once in a while it might be cool. It's just a nice addition to my growing bag of tricks!
What have you added to your bag of tricks that you can share with us?


Josephine Wood on
Lynnda Tenpenny on
Jamie Herron on
Another new idea! Great creativity! Thanks!
Gloriann Ehrman on
Alice Roche, CZT 29 on
Kat Van Rooyen on
Sue Leslie, CZT on
Sue on
Pam Stevenson, CZT on
Kat Van Rooyen on
This is so interesting ! Thank you for sharing the tips – I love learning these added techniques and really enjoy seeing the beautiful pieces!
Heather Moffatt on
MKay B B Watson CZT 17 on
Soooo beautiful, Maria! I’m glad you reposted this piece because I had forgotten about this technique. Must try! To my “bag of tricks” I’ve added Sakura gelly roll pens. Sometimes I actually tangle with them, but more often I’ll use one of the lovely Stardust pens to add sparkle here and there with lines and/or dots. There are 12 colors + a clear! I enjoy the Metallics too, particularly the Copper.
Jan Brandt, CZT 12 on
CLARA A BRUNK on